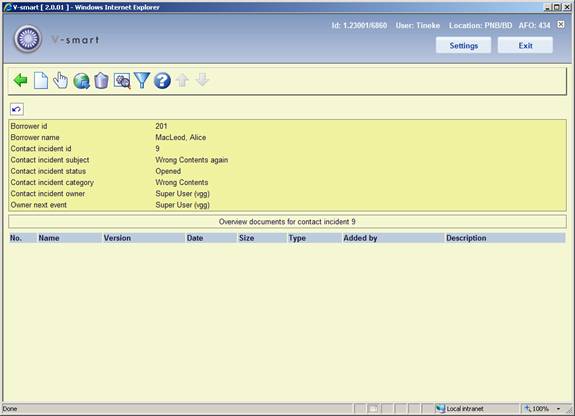
: From the overview screen of incidents select a line and then this option to view documents related to the selected incident. Or select the option from the details screen with events for an incident. An overview screen will be displayed:
Documents are stored inside the Vubis Smart database (and not on an external file server).
: Use this option to add a new document. See section 434.4.1.1.
: Select a line and then this option to view the content of the document. The application that is associated with the document type (e.g. Word for .DOC or Acrobat Reader for .PDF) will be started.
: Select a line and then this option to open a document in a browser window. When you select this option, the system will open a browser window and display the document. If the browser cannot display documents of certain file types (e.g. ZIP documents), it may revert to its Open / Save As common dialogue. Please note that the exact behaviour may differ between browsers.
: Select a line and then this option to remove the document from the list. The system prompts for confirmation.
: Select a line and then this option to view its properties, the system will open a popup window that will allow you to view the document properties and modify the Description.
: Use this option to limit the display by certain criteria. See section 434.4.1.2.
: Use this option to add a new document. After selecting this option an input form will be displayed:

Document: Use the Browse button to select the required file. This will open the standard Windows dialog box for searching files.
Description: Enter a brief description of the document.
Date received: This defaults to 'today'. You can select another date from the dropdown calendar.
After you have filled in the necessary fields (only the document name is mandatory), click on the button. The system will start the upload of the document; depending on the file size and the network connection speed, this may take some time. After the file is uploaded and stored in the database, the system will show a confirmation message.
: Use this option to limit the display by certain criteria. A selection form will be displayed:

Search for: enter the search term; if you leave the search term box entry, all documents (that fall within the defined date range) will be displayed
Search in: indicate in which data element you want to search; the system supports the following options:
·
Name: the name of the document
·
File contents: the full content of the document; this is only suitable for documents that contain text (e.g. DOC, XLS, PPT, [most] PDF, and others, but not JPG, MPG and other image, audio or video files)
·
File description: the description that is attached to the document
Contact incidents from: the start date of a date range; by default this will be the current date.
Contact incidents to: the end date of a date range; by default this will be the current date.
The three options for viewing emails are very similar. They are described in general below.
: Select an incident from the overview screen of incidents and then this option to view emails related to the selected incident. Or select this option from the details screen with events for an incident.
: Select a line and then this option to view emails related to the selected borrower. Or select this option from the details screen with events for an incident.
: Select this option to view general emails.
In all three cases, an overview screen will be displayed. They look similar.

: Use this option to add a new email message. See section 434.4.2.1.
: Select a line and then this option to view the email properties such as subject, sender, recipient(s) and body.
: Select a line and then this option to remove the email(s) from the list. The system prompts for confirmation.
: Select a line and then this option to move the email to another folder (e.g. from “Inbox” to “Archive in”).
: Select a line and then this option to link an email to a specific incident. (This option is only relevant for emails that are not yet linked to a specific incident.)
: Use this option to limit the display by certain criteria. See section 434.4.2.2.
: Use this option to switch to a different folder (e.g. from “Inbox” to “Archive in”). See section 434.4.2.3.
: Use this option to add a new email message. After selecting this option an input form will be displayed:
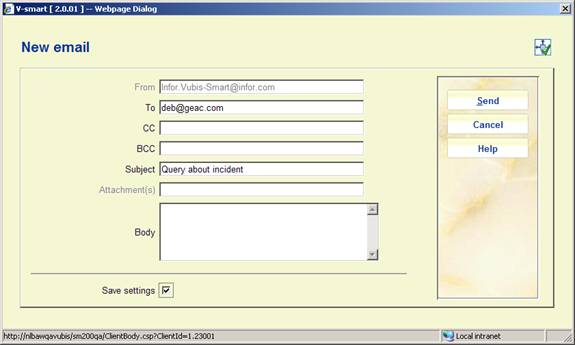
From: Protected field containing the email address of the sender. (This email address is a system parameter and is not related to individual emails.)
To: Enter the email address of the recipient.
CC: and BCC: Optionally enter email addresses for carbon copy and or blind copy recipients.
Subject: Enter the subject of the email message.
Atttachment(s): Documents that are linked to the email as an attachment.
Body: Enter the actual text of the email message.
: Use this option to limit the display by certain criteria. A selection form will be displayed:
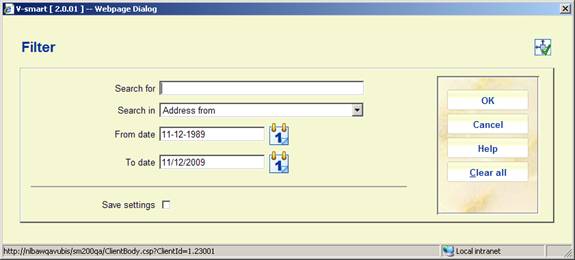
Search for: enter the search term; if you leave the search term box entry, all documents (that fall within the defined date range) will be displayed
Search in: indicate in which data element you want to search; the system support the following options:
·
Subject and content of the email
·
Subject
·
Content
·
Address to (the recipient address)
·
Address from (the sender address)
From date: the start date of a date range; by default this will be 20 years prior to the current date.
To date: the end date of a date range; by default this will be the current date.
: Use this option to swicth to another folder. A selection form will be displayed.
After switching to another folder, the new current folder will be displayed in the header pane.
· Document control - Change History
|
Version |
Date |
Change description |
Author |
|
1.0 |
November 2009 |
creation |
|